
|
|
KAWAI VERTICAL PIANO KAWAI MUSICAL INSTRUMENTS MFG. CO. , LTD. Regulation Process Index 1 Tighten Screws, Check Action, Strike Point, Hammer Blow 
1. Tighten Screws, Check Action, Strike Point, Hammer Blow Tighten all Screws in Plate, Case, Action, and Bench. Check Action Centers for loose or tight fit. If loose, repin with a larger pin. If tight, ream the bushing and replace the pin. Make sure all Springs are in position and functioning. Check Action Friction, and make sure all parts move smoothly. Hammer No. 88 should strike the string 2.0mm - 2.7mm from the capo bar. The final position should be chosen by the sound. If necessary adjust action support bolt up or down. After changing the support bolt, bend the action bracket bolt at the top up or down to keep the action held in position tightly. Hammer blow distance should be 46mm. Measure from the tip of the hammer to the strike point on the strings. Set the blow distance to 46mm by increasing or decreasing the thickness of the felt block between the hammer rest rail and action brackets. 
2. Keys Space and square: Make the keys parallel and straight at the front by tapping the balance rail pin to one side or the other. Then space the keys by bending the front rail pin to one side or the other with a spacing tool. CAUTION: For spacing the keys, put the spacing tool below the felt punching to avoid nicking the pin. Key Front Bushings: Inspect keys by depressing each key fully and moving side to side while holding the balance rail to prevent rocking at the balance rail bushing. There should be very slight lateral movement. Ease or Key Balance Bushings: Place fingers on front and back of key button. Move from side to side. Again, there should be slight lateral movement. Ease or Key Balance Hole: Inspect keys to see that they will fall of their own weight when lifted at the front and lightly held at the back. If they are too tight they can be eased. Only ease the sides of the hole if needed by turning the easing tool inside the key 90º after inserting through the bushing. If the balance hole is loose on the pin, apply a few drops of alcohol and water (Isopropyl 70%) to the hole then set aside. Once it is dry, 
3. Travel, Angle Hammers Push the Hammer rest rail towards the strings and look for sideways movement as the hammer travels to the string. Place a piece of travel paper between the flange and hammer rail on the opposite side of the screw that the hammer is traveling to. Use different thickness or length of paper strips under the flange to determine the degree of correction. Check hammer angle – spaces between hammers must be equal and parallel at the “rest” position and “strike” position. If an error is detected then the shank can be heated up and then carefully and very gently twisted back into the correct alignment position. CAUTION: Do not use excessive force as this will stress the flange and possibly damage the bushings. Only use the blue flame to heat the wood, because the red portion of the flame will leave black marks. 
4. Fit Hammers to Strings and Align Push the hammer forward against the strings by pressing on the catcher with your fingers. Center the Hammers to the string by loosening the flange screw and shifting the hammer over and Space all Hammers. Push the hammer against the strings again and pick the strings to check for proper fitting. Each hammer should touch all strings with the same pressure. If some strings are dampened by the hammers but others are not, lightly file the hammer top to even the pressure on the strings. 
5. Lost Motion Align Wippens: the jack should be centered under the butt, and the capstan under the wippen. To change the lateral position of the wippen, loosen screw and shift the wipppen. To change the position of the jack tail under the If Capstans have Wires, Space and Align Capstan Post. Center the Capstans to the Wippen heel. (left or right) Center the Capstans to the Wippen heel. (front or back) Regulate Capstans: Check by pulling back slightly on the hammer rest rail. The hammers should follow very slightly. When pressing the key down very slowly, the backcheck and catcher should start move at same time. If the backcheck moves first then there is too much lost motion. Tap down on the back of the keys. If hammers move, the capstans should be turned down for more lost motion. 
6. Hammer Let Off Adjust the jack stop rail (sometimes combined with the letoff rail) so that when a key is firmly pressed there is at least 1mm space between jack and felt cushion rail. Failure to have adequate clearance will cause wippen to hang up on a hard blow. If you move the regulating rail, be careful to keep the letoff buttons centered over the Jack tails. Let-off should be 2.0 mm in the treble, 2.5 mm in the middle, 3.0 mm in the bass. Adjust Regulating screw for correct letoff while playing the key slowly and watching the hammers. 
7. Key Height Check the Key Height from top of the Keyslip 20mm ~22mm If most keys need to be raised or lowered, add or remove shims (thick cardboard or wood veneer) under balance rail at the Set both end white keys to correct height by placing paper punchings under the keys and cloth punchings. Using a straightedge, mark the low and high spots with chalk for which size punching will be needed. Remove each key and place paper punchings under the keys and cloth punchings. Repeat as necessary until keys are level. Set both end black keys to 12mm above the white keys. Level as with white keys. 
8. White Key Dip Whites: Using a 10.3 mm dip block, depress each key and compare with the height of the neighboring key. Add or remove paper punching until desired dip is achieved. NOTE: Make certain the same pressure is used throughout the keyboard. Move back and forth to Another way to double check for evenness is to push down 3 keys with 3 fingers using the same light pressure and check if keys are level. Thicker card and paper should be lowest on the pin, thinner paper upper. There should be no more than 4 of any one thickness paper. 9. Backstop, Black Key Dip Space the backchecks to the catchers by bending backcheck Wires. Square backchecks to catchers. Set backchecks on white keys so the hammers check 15mm from the strings on a medium mf blow. After the white key backchecks are set, align the black key backchecks to match the white notes using a straightedge. All backchecks should be in a straight line. Once the backchecks are aligned, set the black key dip so that the hammers catch the same 15mm distance from the strings, matching the white keys 10. Damper Alignment: Adjust damper wires so that the damper felts are seated squarely on the strings. Check the damper function by playing the notes staccato. Lift by Pedal: Damper wires must be regulated in or out, allowing all dampers to lift evenly with the the pedal. 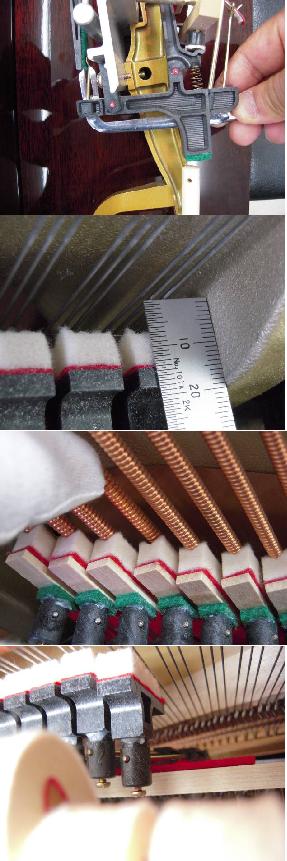
Lift by Key: Damper should lift with the key when hammer is halfway through its travel. Bending the damper spoon toward the strings causes the damper to lift earlier; toward the action causes later lift. Adjust the damper pedal (and bass sustain, if any) to allow slight lost motion before the dampers lift from the strings. The Dampers should follow the string when the string is pushed lightly. When keys are played and the hammers are in check, make sure there is 2 – 4mm space between damper wires and damper stop rail felt. To adjust, bend the damper stop rail mounting fork (if applicable), or add / remove paper punchings between the damper stop rail and action bracket. 
11. Soft Pedal and Bridle Straps, Wires Adjust Soft Pedal: set it so there is 2mm lost motion between hammer rest rail and pedal rod. Adjust Pedal Prop Bolt Nut Bridle Wires Side to Side: Align the bridle wires evenly in between the two backcheck wires (for this note and the neighboring note) to make sure the bridle tapes never touch the backcheck wires. Bridle Wires Front or Back: Bridle Wires should be as tight as possible without causing the wippens to be lifted when the soft pedal is pressed firmly all the way down. 
12. Muffler Pedal Install Muffler Regulate muffler pedal adjusting nut so that the muffler felt clears all hammers when the pedal is disengaged, but the felt moves down far enough in front of the hammers to mute the sound when the pedal is engaged. After adjusting, turn the lock ring down tightly against the mounting block. Muffler rail (disengaged) Muffler rail (engaged) |